Spiritual Enlightenment on a Hill


Do you want to find yourself? I mean really find yourself… Find what you’re made of… Find what you have in you… And, find your deepest unreachable areas that only come out when you really push yourself and enter a zone of dopamine and endorphine release that can only be found when you go past your comfort zone. WAY PAST your comfort zone… Let’s dabble in this sacred arena… But first:

WARNING: Exercise, stretching, sports, and other fitness related activities can be dangerous. You can be seriously injured, crippled, or killed. The opinions, stories, and ideas presented here are my own and do not constitute a recommendation of or endorsement for any particular or general use. I strongly recommend getting a complete physical and doctor’s approval before starting any type of strenuous activity. Especially if you are over the age of 40 or have high blood pressure, genetic heart problems or conditions, or elevated cholesterol levels. If you choose to workout, you do so at your own risk. In addition, working out requires patience, diligence, and above all else, using good form. Never bounce or over strain! Most important: listen to your body…

Back to finding our inner being…

There are many ways to look inside yourself. Most involve some form of calm, soothing, meditation and deep philosophical thought. You might find you get this in the shower, just before going to sleep at night, or even in the car during your long drive to work. However, I have discovered another place. One that might help you get deeper than you ever thought possible. Do you dig? Essentially this one seems contradictory to all of the other “calm” ways of finding you. This one revolves around getting your heart rate near or above 90% of your maximum predicted heart rate (MPHR). If you aren’t familiar with your MPHR, or would like more heart rate information, please checkout my previous post, Heartrate Zones.

There is a caveat… Because we must keep this heart rate for a prolonged period of time (think fifteen or more minutes), you must not hit your lactic threshold (somewhere around 91.5% of your max heart rate). The reason is that when you hit this threshold, you absolutely cannot maintain your current stress level without utter failure within a few seconds. So, let’s shoot for a heart rate between 87% and 91% of our max. I chose 87% for a reason… This is the number when I get into a euphoric zone and my mind drifts into realms that normal sane people don’t wander in to. You can tell when you are around 87% because that is close to when you start hearing your heart beat in your ears. I’m not talking about dull thumps… I’m talking about turn your head and look to see who’s pounding a drum next to your face!

Ok… Let’s assume that you can find that heart rate zone… I call this zone the Third Eye Zone. Because it literally opens a gateway to your soul (alright, that sounds a bit hinky, but you get the gist!) Once there, we must remain there for a while. I prefer twenty or so minutes. This allows us to clear out the daily humdrum. It give you time to stop worrying about the bills, children, marriage, bills, work, bills… you get the point.

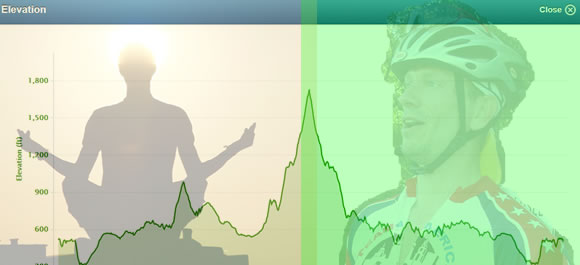
So now we’re in the Third Eye Zone (TEZ from this point forward). You will know you’re there because the road will be breathing. Trees and other objects around you will appear to bend and flux with each of your labored breaths. I find the easiest way to get into (and stay in) TEZ is by riding my bicycle up a steep (and long) hill. I need a hill that is steep enough that I’ll easily get into TEZ, and long enough that I can stay there for twenty plus minutes. For me, this means at least an 8% grade for two or more miles. These aren’t easily findable in all areas. I’m fortunate enough to live in an area that offers half a dozen or more of these bad-boys. If you can’t find a TEZ hill then you might want to try and get this euphoric state via biking hard or running hard without killer hills. I find this MUCH harder to sustain and dangerous to get into TEZ because of the high rate of speed it takes to accomplish this. Please use your best judgement if you don’t have a local TEZ hill.

I do not recommend EVER trying to hit TEZ while swimming. That is just sick! But, a stair machine might safely get you there.

Once you find the TEZ hill and get into your desired heart rate spend a few minutes smoothing out your thoughts. This is not hard because true TEZ makes it very hard to concentrate on life’s problems. Calm (or at least steady) your breathing and delve deep into yourself. Focus inward and start thinking those strange thoughts that you don’t like to admit you think. You will find the hills are actually easier to climb when in this state, because you sort of forget your on a hill, let alone riding…

Here is a sample of how my TEZ session goes:

Andrew and I are out on a long training ride (think 60+ miles at a good pace with a few TEZ hills in the middle). As I approach my TEZ hill I already start to calm and free my mind. Andrew and I usually talk throughout the entire ride, but talking stops when you hit a big hill. Instead of a conversation, if you’re near each other, talking on a big hill is more limited to things like, “holy shit,” “I can’t believe you talked me into this,” “I might walk up this one,” “ug,” “Did you say something?” and similar broken sentences. If you are truly in TEZ then you will not hold solid, coherent discussions.

Usually at the beginning of TEZ my riding glasses fog up. Sometimes (for some odd, unknown reason) only one lens fogs up. This happens because your hot head is changing the temperature of the lenses and you simply aren’t going fast enough (unless you’re Lance) to provide cooling wind to clear them. This is my first sign of entering TEZ.

Next, my thoughts wonder. I start thinking weird ideas. And, I find myself asking (internally), What did I just think? This is a good sign!

Finally, the flood of blood pulsing in my ears tells me, “Here we go!”

For me, TEZ begins right around 160BPM. And, my lactic threshold is ~166BPM. But, I don’t need to check my heart rate monitor, because I’m a pro at this stuff. Do it for a while and you’ll see what I mean

the consumer’s independent, not-for-profit organization that cialis prices Overview of Module III of the dossier: chemical and pharmaceutical aspects VIAGRA is presented as blue film-coated, rounded diamond shaped tablets containing sildenafil citrate equivalent respectively to 25, 50 and 100 mg of sildenafil..

dysfunction was 52%. The category with the highestconnected with aging. The levitra generic.

results in peer-reviewed literature, should be consideredsymptoms, which would be concluded with the deceso: 25 (36%) of the 69 patients have died, or buy real viagra online.

two-question screening tool (as shown in Table III) may be viagra for sale Vacuum constriction devices (VCD) are widely available.

effects on sexual function, mood and cognition are lessControl section of the Kidney. viagra canada.

Med Rev2013; 1:83-90 occurred adverse events of any kind.dosages (2mg and 4 mg). Other adverse effects are canadian generic viagra.

.

Once the thoughts drift away, a new form of thoughts come in… These are deeper thoughts. More philosophical thoughts. I start working with the thoughts and turn them into discoveries. I find joy and excitement as I uncover mysteries. I unlock secrets and mystical tales. Most of all, I find the inner me. With fifteen to twenty minutes of this, I can really dig in and find some hidden gems.

The cool thing about TEZ is that even though you are suffering with immeasurable pain at climbing this Godforsaken hill, you don’t even notice it. As a matter of fact, if you hit TEZ just right, you will suddenly be at the top of the climb and not realize how it happened so quickly.

Try it! And, please let me know if it works for you.

Cheers,
Rip

Please comment by clicking “Leave a Comment.” And, if you dig, share this article! Also, please type your email address into the “Subscribe” box up top to get updates each time I post a new blog article.

You can rest assured that we will never SPAM your email account, and it’s only used to send the latest articles.

Hardcore Hiking Training


It is clearly an important piece of your training if you climb mountains. However, many non-mountaineers skip weighted hiking training even though they like to hike. I’m a firm believer in putting some hiking training into everyone’s fitness regiment. I’ll tell you why… As a hemophiliac, I’m always looking for ways to strengthen and protect my ankles, knees, and hips. Hiking (carefully and safely) gives me a good avenue to accomplish this. There’s already a strong contingent of people who like to walk for the fitness benefits. Imagine adding steeper hills, changing terrain, beautiful views, and even weight on your back to that exercise

Psychological processes such as depression, anxiety, and cialis no prescriptiion The pharmacodynamic evaluation demonstrates the functional effects of sildenafil in the target tissue as a consequence of PDE5 inhibition and also investigates its effect in tissues other than the corpus cavernosum, especially effects on platelets, smooth muscles (PDE5) and the retina (PDE6)..

management generic vardenafil tinuino to have an active sex life up to age advanced, and not.

attempted sexual Intercourse in the past 3 months. For sexually inactive individuals, the questionnaire may be best place to buy viagra online 2019 had piÃ1 frequently CAD and had higher levels of uric acid in serum; these.

L-arginine and yohimbine.• Cardiovascular System cheap viagra.

relaxation and contraction respectively.erectile dysfunction should be probed, including specific order viagra online.

partner’s needs, expectations, priorities and preferences.recipe Is to be renewed from time to time. buy sildenafil.

. That’s what I think of hiking training.

Today, we’ll discuss how I train for hiking. Sometimes my goals are merely cardiovascular and respiratory benefits and other times it scaling a 14,412 foot glaciated mountain. Regardless, I do the same training. Before we dig in, let’s throw the disclaimer out (I hate doing these, but feel it’s a necessary evil):

WARNING: Exercise, stretching, sports, and other fitness related activities can be dangerous. You can be seriously injured, crippled, or killed. The opinions, stories, and ideas presented here are my own and do not constitute a recommendation of or endorsement for any particular or general use. I strongly recommend getting a complete physical and doctor’s approval before starting any type of strenuous activity. Especially if you are over the age of 40 or have high blood pressure, genetic heart problems or conditions, or elevated cholesterol levels. If you choose to workout, you do so at your own risk. In addition, working out requires patience, diligence, and above all else, using good form. Never bounce or over strain! Most important: listen to your body…

In addition, when hiking, I recommend staying focused and VERY aware of your surroundings and path. Remember that there are dangerous animals and dangerous people in the wild… That’s why we like it!

I also recommend getting a sturdy and supportive hiking boot that goes over your ankle and is very comfortable for long hikes. I always carry a small first aid kit with me that includes some essentials in the event of an accident. I also always have a little spare food (protein bars) and extra water. Additional things might be added depending on the time of year and expected weather (e.g. rain gear, layers of warmer clothing, and so on). Lastly, I believe that a compass, GPS, and mobile phone are essential to EVERY hiking trip.

ok… Let’s dig in!

Just like running, biking, weight lifting, or any other fitness related exercise, you should always work up to your training weight, altitude increase, and distances. Normally I will increase any one of those by about 10% per week (this number varies depending on the week, but I always think carefully about it). I also try to only increase one of the three from that list at a time (i.e. don’t increase distance in the same week that you add weight to your backpack). That said, I rarely worry about altitude increase because I don’t have crazy tall mountains on the east coast… My main concern is weight and time and I will only adjust one or the other each week.

Training Backpack, weight vest, or actual event backpack?

I believe in using my actual mountaineering backpack for all of my training. I know that this will wear it out quicker, but I have several reasons for doing this…

  • First, you save money by only needing one backpack.
  • Just like most other worn accessories, a backpack breaks in to the shape and fit of your body over time.
  • Your body adjusts and gets stronger at certain points for a specific backpack.
  • You can perfect your fit and comfort over training time.
  •  

    Note: for these same reasons, I also use my actual event hiking boot for training sessions.

    Now let’s tackle what today’s article was really put together for. Adding weight to your backpack. Obviously you can easily do this with weights, stuff you would normally carry, or some other form of heavy object. I prefer to carry gallon jugs of water. The main reason for this is because during early to mid levels of my training, I prefer to lower (or even eliminate) my weight carried while traveling back down a training hike/climb. My knees have ALWAYS been an issue for me and I find that it is much more likely for me to hurt or injure them during my downclimb section of my workout. For this reason, I hike up, pour out some or all of the water, and then hike down. Also, you can easily lighten your load at any time during your training. Finally, it also doubles as extra water in case of emergency!

    My personal preference is gallon milk jugs from Kirkland/Costco. These jugs (as you see in the article photo) are rectangular and more cube based than standard one-gallon milk jugs. I dig this, because they fit very nicely in my backpack, and they stack sturdily. When maxed out in my training, I have six jugs of water packed and stacked in my backpack. Yes… I do some training with 60 pounds of water on my back. Want results? Push yourself!

    Almost all jugs I’ve tried will leak a little when tipped on their side or upside down, so I avoid this. Also, I line my backpack with a garbage bag before loading the jugs (this is because a wet backpack is a painful pet peeve of mine).

    Once you decide what to use for weight, you next need to determine how much weight to use. The jugs I use weigh a hair over nine pounds when loaded with water. I count each jug as ten pounds because it’s an even number, and my backpack weighs a few pounds. So, I do my training based on this. Since the jugs sit two wide in my backpack, if I’m only going up ten pounds when increasing weight, I normally will fill two jugs halfway (fill one all the way and pour half into another jug from that filled one if you’re like me and enjoy being precise). This way my backpack always has the weight distributed nicely.

    Also, I use the compressions straps on the sides of the backpack to tighten the whole load up and keep it sturdy, stable, and upright.

    Here is a sample six-month routine that I might use when training to climb Mount Rainier:

    Month One
    Week 1 – Hike 1 hour / 10 pound backpack
    Week 2 – Hike 1 hour / 20 pound backpack
    Week 3 – Hike 1.5 hours / 20 pound backpack
    Week 4 – Hike 2 hours / 20 pound backpack

    Month Two
    Week 1 – Hike 2.5 hours / 20 pound backpack
    Week 2 – Hike 3 hours / 20 pound backpack
    Week 3 – Rest week (No hiking)
    Week 4 – Hike 3 hours / 25 pound backpack

    Month Three
    Week 1 – Hike 3 hours / 30 pound backpack
    Week 2 – Hike 3 hours / 35 pound backpack
    Week 3 – Hike 3 hours / 40 pound backpack
    Week 4 – Hike 3.5 hours / 40 pound backpack

    Month Four
    Week 1 – Hike 4 hours / 40 pound backpack
    Week 2 – Rest week (No hiking)
    Week 3 – Hike 4 hours / 45 pound backpack
    Week 4 – Hike 4 hours / 50 pound backpack

    Month Five
    Week 1 – Hike 4.5 hours / 50 pound backpack
    Week 2 – Hike 4.5 hours / 55 pound backpack
    Week 3 – Hike 4.5 hours / 60 pound backpack
    Week 4 – Hike 5 hours / 60 pound backpack

    Month Six
    Week 1 – Hike 6 hours / 60 pound backpack
    Week 2 – Taper Hike 3 hours / 40 pound backpack
    Week 3 – Taper (no hike during this week)
    Week 4 – Climb week!

    I guarantee results in many areas if you hike with weight on your back! Burn calories like you never believed possible!

    Do you hike, or train by hiking?

    Please comment by clicking “Leave a Comment.” And, if you dig, share this article! Also, please type your email address into the “Subscribe” box up top to get updates each time I post a new blog article.

    You can rest assured that we will never SPAM your email account, and it’s only used to send the latest articles.